Tag Archives: Cooking onboard

Red Pepper Sauce

Red Pepper Sauce.
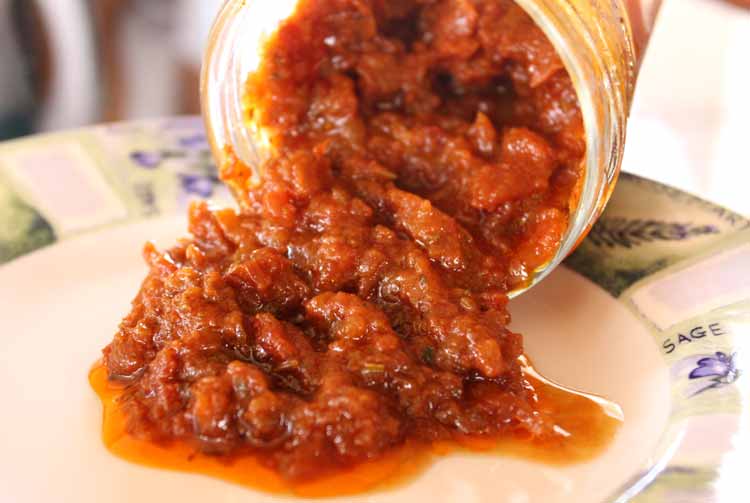
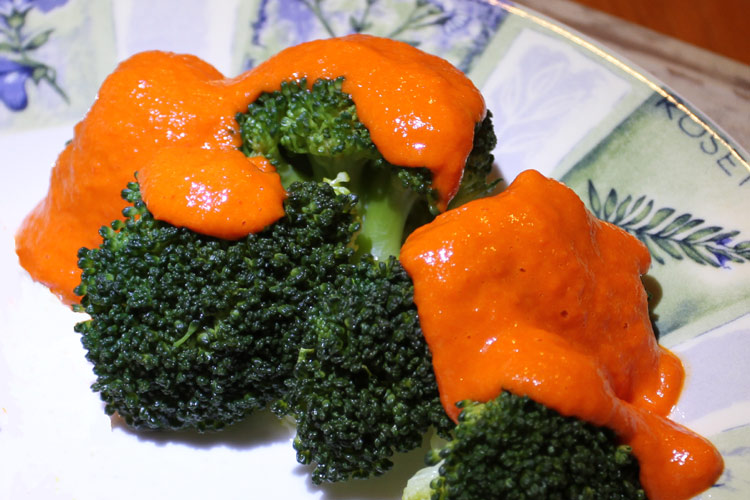
Rich, thick, looks brilliant and tastes even better
click to enlarge
The colour is vibrant and the taste is so pure.

As we continue to search for the beauty of flavour simplicity, we’ve honed this recipe to produce a sauce that’s one of the most beautiful to look at, let alone a tasting delight.

Ingredients

10 medium size red peppers
Unsalted butter
Pinch of salt
Just a tiny bit (thimbleful?) of veg stock
Maybe, just maybe, a drop or two of organic maple syrup

Preparation

Cut the peppers into quarters and remove all traces of the white bits and seeds.

Brush with a small amount of light olive oil on both sides, and place them on a baking sheet in a roasting tray, skin down.

Put the tray on the middle shelf of an oven at 180C.

After 20 mins or so when the peppers are cooked, remove and place the quarters in a poly bag to sweat a while.

One by one, take them out and remove the black bits, only. Be careful not to lose any of the juices.

When cooked, remove the peppers from the oven click to enlarge
Place the juices and peppers into a liquidiser and liquidise well. You may find the liquidiser struggles given there’s minimal liquid. If this happens, shake it about. If this doesn’t help, add a thimbleful of vegetable stock.

Sieve through a ‘normal’ sieve using the back of a spoon to force the liquid through.

Liquidise again, adding just a pinch of salt and reasonable lump of unsalted butter to create a rich mousse.

Maple syrup?

If, and it’s a big if, you find the sauce to be slightly bitter, add a drop or two of maple syrup. A slight bitterness tends to be caused by the type of pepper and the time of year. Smaller peppers are sweeter than large.

Removing the skins

This is a question we’re often asked. The answer is simple.

Removing the skins,

  • is a fiddly and time consuming job, and never 100% successful.
  • removing the skins also removes some of the gorgeous oils

…so keep the skins and let the sieve remove them!

Piers and Lin
from the galley of
Play d’eau
Fleming 55
Beaucette Marina

You can get in touch with us any time by using our Contact Form.

Pea Soup

This pea soup has such a great depth of colour
click to enlarge
The French just seem to have a way with food, don’t they?

When visiting France, we always look forward to our first can of Petit Pois. Only recently, did we realise the one we really liked had lettuce with it. Lettuce? Well, that sowed the seed for this recipe.

It took a number of trials, but we believe this to be the winning formula – and “it’s yumptious” as my great niece told me.

For the soup – 8 servings

1kg frozen peas – petit pois are best
25gm flat leaf parsley leaves only, no stalks*
30gm lettuce leaves (from green ‘floppy’ lettuce)
40gm Salted butter
1 ltr Vegetable stock
Salt

Wilt the lettuce in the butter and set aside
click to enlarge
* Keep the stalks for your next batch of vegetable stock.

For serving

Some finely chopped parsley for the garnish
Bread rolls or Croutons

You will need

Saucepan
Hand-held or small stand-alone liquidiser

Making the Pea soup

Trim the lettuce until you have the correct weight of green leaf.

Over a medium heat, melt the butter in a saucepan, add the lettuce and stir gently until it’s wilted. Remove the mix to a dish and set it aside.

The peas, parsley and stock
all a-bubbling in the pot
click to enlarge
Into the same pan (don’t clean it – whatever is left is good flavouring) place the peas and enough stock to cover them. Add the parsley on top.

As it heats to simmer point, stir occasionally, making sure there’s enough stock to keep it all covered. Keep simmering for a few minutes until the peas are just cooked.

Remove the pan from the heat and add the lettuce and remnants of the butter.

After it’s cooled a while, liquidise well – really well.

Adjusting to taste

At this point, you need first to adjust the soup to the right consistency. If you think it’s too thick, add more stock in small quantities. We believe this soup is far better thinner than thicker.

Once the consistency is right, add salt. Keep tasting until this is just right as well. Don’t add pepper. The black specs will spoil the look.

‘Le crunch’ from croutons are a great addition
click to enlarge
As with so many of our recipes, this soup is much better after a night in the fridge. The flavours come together and seem to enrich themselves.

A ‘minty’ enhancement

If you want a little something extra, go ‘minty’. Start by adding 25gm of mint leaves before liquidising, with more if you want a hefty minty kick.

Serving the Pea Soup

Reheat the soup but do not let it boil. Stir well and check again if it needs more salt and more stock. If you’ve used all your stock, skimmed milk is OK.

Pour into warm bowls and add a sprinkling of finely chopped curly parsley on top.

For ‘le crunch’ add some croutons but don’t let them become soggy. To make sure this won’t happen, serve them separately.

This really is a ‘yumptious’ soup.

Piers and Lin
from the Galley of
Play d’eau

You can get in touch with us any time by using our Contact Form.

Croutons

Cut the bread into 15mm squares
and place them in a bowl
click to enlarge
Although we are fans of Crouton Soldiers, ‘normal’ croutons can be used to great effect to bring ‘le crunch’ to any liquid dish.

For the Croutons

1 slice of bread/person
Light olive oil

You’ll need

Kitchen paper
Teflon non-stick cooking mat
Baking tray

Making the Croutons

Carefully cut the sliced bread into 1.5cm squares. Tip: Leave the bread on a plate overnight to dry out and start to go stale. Makes it easier to work with.

Drizzle some light olive oil on them
and mix with your hand
click to enlarge
Put the squares in a bowl and gently sprinkle some light olive oil on them. With your hand, mix it all about without damaging the bread. Add another sprinkling until all of them have absorbed some oil and are lightly basted.

Remove the squares from the bowl and place them on a Teflon non-stick cooking mat on a baking tray and add one last sprinkling of oil. Make sure none of the squares are touching one another.

Place the tray in a pre-heated oven at 170 degrees for 10 minutes or so, removing them when they are golden brown. Tip: be careful with the timing – they can quickly over cook.

When they’re done, lift them out and pour them on some kitchen paper to absorb any surplus oil before placing them on a separate dish.

They should be crunchy and gorgeous and not taste of olive oil (that’s why you use a light olive oil).

Use them as soon as poss. They tend to pick up the dampness in the air and go soggy.

Piers and Lin
From the Galley of
Play d’eau

You can get in touch with us any time by using our Contact Form.

Place them on a baking sheet
making sure they don’t touch
click to enlarge
When golden brown
remove them from the oven
click to enlarge

Raspberry Coulis

Three ingredients are all that’s needed
Raspberries, lime juice and maple syrup
click to enlarge
This will make about 200mls of the most gorgeously rich, raspberry coulis.

Ingredients

500gm fresh, ripe raspberries
½ lime
Maple Syrup (pure, and organic if at all possible)

When made with really fresh and ripe raspberries, this simple recipe makes a rich and sumptuous coulis which can be stored in a fridge for two or three weeks provided it’s covered with cling film so no air can get at it.

When would you use a Raspberry Coulis?

Whenever you want to enrich a desert, particularly with fruit, ice-cream and panna cotta.

To prepare

Mash the berries through a fine sieve
click to enlarge
Remove any imperfections from the raspberries and place them in a fine sieve.

With the back of a stainless steel spoon mash and press them through to extract just the juice. Throw the residue away.

Squeeze ½ lime through a clean fine sieve to remove any flesh and pips. Add it all to the liquid raspberry, and stir well.

Add maple syrup by the teaspoon, tasting as you go until the coulis is left just ‘tart’.

This may well take more than you imagine – keep going, but don’t over-sweeten. You can always add more when you come to use it.

Why lime, and why maple syrup?

Using lime rather than lemon produces a far superior coulis.

A rich sumptuous raspberry coulis
click to enlarge
We used to make it with lemon until reading a cookbook by Chef Damien Pignolet who had been told off by one of his guests for using lemon. She made him go back to the kitchen and make a fresh coulis for her using lime! On tasting it, he agreed.

Many recipes tell you to use icing sugar when making coulis. The problem here is that you can taste icing sugar, but if you use maple syrup there is no taste at all.

You are left with the most divine coulis.

A word of warning – you’ll find you never make enough. Guests will devour the coulis by the spoonful.

Piers and Lin
From the Galley of
Play d’eau

You can get in touch with us any time by using our Contact Form.

Raspberry coulis on a dessert of white peach slices and raspberry sorbet
Hot tip: Always check the coulis for sweetness before using, adjusting with more maple syrup

Stuffed Eggs – delectable and luscious

Basic ingredients for stuffed eggs
click to enlarge
This is the most glorious recipe for a food that simply doesn’t last long on the plate.

Simple to make, luscious to eat, and very, very moorish.

Beware the smash and grab raids….

Stuffed Eggs

6 eggs
¼ tsp finely chopped shallot
4 tsp chopped curly parsley
1 tsp chopped curly parsley for the garnish
4 tsp mayonnaise
1½ tbsp cream cheese (or half and half with Boursin)
Small pinch of salt
Paprika or Smoked paprika for ‘garnishing by dusting’

The yolk mixture should look rich and creamy
click to enlarge
Note: It’s always best to use your own home made mayo. However, if this isn’t to be, we’ve found Lesieur mayo to be excellent.

Preparation

Carefully place the eggs in a saucepan and cover with cold water. With a medium heat, slowly bring them to a gentle boil and keep them simmering for a further ten minutes.

Whilst the eggs are cooking, finely chop the parsley and shallot.

When the eggs are cooked, place the saucepan under the cold water tap and allow cold water to flush the heat away.

Once the eggs are cold, pick them out of the saucepan one by one, gently crack the shells and remove them and the outer membrane, replacing the shelled eggs back into the saucepan to stop them turning black.

Almost ready…
Filled with the yolk mixture, half dusted with paprika, and waiting for their final garnish with parsley
click to enlarge
With a sharp knife, slice the eggs in half lengthwise. Ease the yolk out of the white and place it in a bowl. Return the white to the saucepan.

With all the yolks in the bowl, add the shallot, cream cheese, mayonnaise and a pinch of salt, and mix them thoroughly with a fork.

When the mixture looks rich and beautifully creamy, taste it to see if it needs more mayo or cream cheese or salt and adjust to taste. It’s almost a case of you can’t add too much.

When happy with the mix, add the chopped parsley and fork it in.

Dressing the eggs

One by one, remove the whites from the saucepan, place them on a dish cloth and carefully dry the inside by dabbing with the egde of the cloth. This helps the yolk mixture to stick to the white and not slip out!

Ready to be served
It must be pointed out that in the few moments my back was turned, three ‘disappeared’….
click to enlarge
With all the eggs stuffed and arranged on a plate, sprinkle them with more finely chopped curly parsley.

Try dusting some of them with paprika or smoked paprika. The easiest way to do this is by placing a pinch in a small fine sieve (or tea strainer). Hold it over the eggs to be anointed, and gently knock it.

How many is enough for two?

We have to say that whenever we’ve made stuffed eggs they are barely on the plate before there are smash and grab raids.

However, as part of a lunch, 6 eggs between two seems a good balance. When you have guests, you will need many more.

Piers and Lin
from the Galley of
Play d’eau
Fleming 55

You can get in touch with us any time by using our Contact Form.

Rich tomato sauce

This rich tomato sauce is brilliant for pizzas and tomato based soups. It should feature as a staple in your on board larder.

Rich tomato sauce
click to enlarge
Create the following quantity in advance and you’ll have plenty to store in jars in the fridge where it’ll keep for months and months and months for use with many meals.

Rich Tomato Sauce

1 red onion
2 kg very ripe tomatoes, mixed varieties
200g vine tomatoes
1 tin chopped plum tomatoes
100g cherry tomatoes
1 250/370gm jar of sun dried tomatoes in olive oil
1 large clove of garlic, crushed
1 tsp mixed dry herbs (Herbs de Provence)
Olive oil as required

Preparation

Start by preparing the tomatoes. This will take a bit time but will be so worthwhile.

First, we need to skin them. Make a cross with two small cuts across the bottom of each tomato. Place them, one at a time, in a bowl of boiling water, bottom up. After a few moments you’ll see the skin start to peel from the cross. Lift the tomato out (not using your fingers!) and peel off all the skin.

Repeat this process for all the tomatoes.

Second, you need to de-seed them. Cut each into quarters and use your thumb to scoop out the seeds and non-fleshy bits. Do this over a bowl so all the discard is collected – don’t waste any of it. The liquor this produces is so full of flavour.

Note: If by the time you reach the cherry tomatoes you’re tired, just skin them. There’s no need to de-seed them.

Third, cut the flesh into thirds and add to the bowl of ingredients.

Finally, extract all the juice from the seeds and bits. To do this, pour the bits into a sieve over the bowl of ingredients and press the juice through using the back of a large spoon.

Now, chop the onion finely and fry gently in some olive oil until they’ve become translucent but not coloured. Add the crushed garlic.

After a few moments, add the dried herbs, the prepared tomato flesh, the whole content of the jar of sun dried tomatoes, and cook for 4 hours over a low heat.

There should be enough liquid in the ingredients, but if you need to add some water, do. In the same way, if you need more olive oil, add a tbsp at a time.

When cool, decant into jam jars and store in the fridge. As I’ve said, it’ll keep for months.

Note that we didn’t added any salt or pepper. That’s because this sauce is used as an ingredient with other recipes which, when they’re made, will be seasoned in their own right.

Piers and Lin
from the Galley of
Play d’eau
Fleming 55

You can get in touch with us any time by using our Contact Form.

Gazpacho to cool those hot, hot days

This Gazpacho is just perfect for a hot day when ‘cool’ is needed. It’s so refreshing, so ‘clean’.

(Modified on 3.8.2013 & 17.8.2013).

Making it in these quantities means you’ll have a good number of servings. Any left over can be kept in the fridge for use during a heat-wave, or frozen whilst you wait for the next heat-wave.

Gazpacho
dressed with diced cucumber and shreds of basil
click to enlarge
Ingredients

2 kgs tomatoes, mixed varieties, all very ripe
1 large red pepper, deseeded, pith removed, chopped
1 medium size red onion, chopped
1 large cucumber, peeled and sliced
6 tbsp rich tomato sauce
1 tbsp tomato paste
200ml vegetable stock (or water)
100ml extra virgin olive oil
3 tbsp. balsamic vinegar
1 large clove of garlic
3 tsp salt
½ tsp fresh ground black pepper

To Serve

Cucumber, peeled and diced, excluding the pippy bits
Basil, shredded

You’ll need

Large bowl
Large sieve
Large spoon
Sharp pointed knife
Liquidiser or good hand held blender
Saucepan with boiling water

To Prepare

Peel the garlic, slice lengthways and lift out the core, its soul. The soul causes bitterness, the last thing you want in this soup.

Chop the garlic finely, place it in a large bowl and add the stock, red pepper, red onion, cucumber, rich tomato sauce, tomato paste, olive oil, balsamic vinegar, salt and pepper.

Then attack the tomatoes. You need to skin and de-seed them, leaving only the flesh.

To do this, take a tomato, carve out its crown with a pointed knife, and make a cross with two small cuts across the bottom of each tomato. Place them, one at a time, in a bowl of boiling water, bottom up. After a few moments you’ll see the skin start to peel from the cross. Lift the tomato out and peel off all the skin. Provided the tomatoes are very ripe, this will be an easy task.

Repeat this process for all the tomatoes.

To de-seed the peeled tomatoes, first cut them into quarters. Then, using your thumb, scoop out the seeds and any loose debris into a sieve over the bowl of ingredients; the juice you’ll extract from this later will be key to the recipe. Don’t waste anything.

Set the tomato flesh aside.

Using the back of a large spoon, extract the juice from the seeds and debris into the bowl.

Finally, cut the tomato flesh into thirds and add to the bowl.

Mix everything as best you can.

Ladle the mix into a liquidiser and liquidise, but not into a fully fine liquid. Given the quantity you’ve prepared you may need to liquidise in several sessions.

Pour the final mixture into a clean bowl, give it a final stir, taste, and adjust the seasoning if necessary.

Cover with cling film and place in the fridge for 24 hours to mature.

Serve cold from the fridge with finely chopped cucumber sprinkled on top with shreds of basil.

Scrummy.

Piers and Lin
from the Galley of
Play d’eau
Fleming 55

You can get in touch with us any time by using our Contact Form.

Celeriac soup

What a delicious soup this is. Whether you love or dislike celeriac or even know what it is (!) you will like this soup.

Celaric – not the prettiest veg on the market stall
click to enlarge

Again, the recipe for our celeriac soup has been developed over the last few years, ensuring it’s kept simple whilst maximising on flavour.

For the soup – at least 6 servings

1 medium/large Celeriac
150gm Salted butter
½ ltr Vegetable stock
Sea salt

For serving

50gm Salted butter
100ml Double cream
Crème Fraiche
Finely chopped Chives
Crouton Soldiers
Truffle oil

After liquidising, the celariac soup should be beautifully smooth
click to enlarge

You will need

Saucepan
Hand-held or small stand-alone liquidiser
Bowl

Making the Celeriac soup

Trim the celeriac and remove the outer layer of skin. You only want the white flesh. Take care, since this veg is a tough old thing and needs a sharp knife to cut it. Take care of your fingers.

Slice the celeriac into 2cm cubes. Hint: If there’s likely to be a delay between cubing the celeriac and starting to cook it, cover the cubes in a bowl of water with some lemon juice to stop the celeriac turning brown.

Melt the butter in a large pan, add the celeriac and stir with a wooden spoon to ensure everything is covered with butter.

Cover the pan and cook gently over a low to medium heat (don’t burn the butter) for 10 minutes, stirring every two minutes to keep everything covered in butter.

After these ten minutes are up, add enough stock to cover the celeriac and cook over a medium heat until the celeriac is just soft.

The Celaraic soup before the ‘dollop’ of crème fraiche is added
click to enlarge
Remove the pan from the heat and allow it to cool a bit before liquidising really well. If it’s too thick for the liquidiser, add more stock or fresh milk.

Provided you’ve liquidised it well there’s no need to sieve this soup.

Return it to the heat and add salt as required. You may be surprised how much is needed but you’ll know when it’s just right – it’s obvious.

Don’t add pepper. The black specs will spoil the look.

Serving the Celeriac soup

Pour the soup into a clean pan and reheat – do not boil – and add the double cream. Stir well and check if it needs any more salt.

Finally, check the consistency is right. Add more stock or milk to thin, or keep on the heat to thicken.

Pour into warm bowls and add a sprinkling of chopped chives and a drizzle of truffle oil on top.

Chives, truffle oil and the ‘dollop’ of crème fraiche just make this soup
click to enlarge

Finally, place a small dollop (a Play d’eau technical term) of crème fraiche on the top of each serving.

Each person should have six Soldier Croutons.

Additional touches

As with most soups, leaving them in the fridge to ‘mature’ brings a greater depth of flavour. Keeps well in the freezer.

This soup is also great as an Amuse Bouche, served either hot or cold without the croutons.

Coming soon…
  • Poached eggs that look so good
  • Vinaigrette dressing using a raspberry vinegar

Piers and Lin
from the Galley of
Play d’eau
Fleming 55

You can get in touch with us any time by using our Contact Form.

Vannes – the farmers’ market

It’s rare to find such an extensive farmers’ market. We’ll let the photos do the talking.

Picture postcards of Vannes’ farmers’ market
Oi! Who are you lookin’ at?
click to enlarge
Nougat by the kilo…we bought some….
click to enlarge
Lobsters by the dozen
click to enlarge
Spider crab anyone?
click to enlarge
Ah! Langoustines by the hundredweight
click to enlarge
Henley doesn’t get all the strawberries
click to enlarge
Flowers for all occasions
click to enlarge
Fruit stalls were everywhere
click to enlarge
Even the humble radish has its own display
click to enlarge
Olives of all varieties and flavours – memories of Ganges
click to enlarge
Rose garlic was only one of many varieties
click to enlarge

Piers and Lin
from the Saloon of
Play d’eau
Fleming 55

You can get in touch with us any time by using our Contact Form.

Squash and Ginger soup

Squash and Ginger soup ready to be devoured
click to enlarge

The clue to this beautiful soup lies in its simplicity and flavour maximising. Although the amount of ginger may sound excessive, I assure you it isn’t. It’s just gorgeous.

For the soup – at least 6 servings

1 Large Butternut Squash
200gm Salted butter
½ ltr Vegetable stock
8cm x 2 cm Fresh ginger
Sea salt

For serving

Crème Fraiche
Finely chopped Corriander
Crouton Soldiers

Squash, Ginger, and vegetable stock
click to enlarge


You will need

Saucepan
Hand-held or small stand-alone liquidiser
Cheese grater or a coarse Microplane
Bowl

Making the Squash and Ginger soup

Slice the squash into 2cm ‘wheels’. Cut the skin off, and, using a teaspoon, remove all traces of seeds and membrane.

Using the same teaspoon, use the edge to scrape the skin off the ginger.

Cut the squash wheels into 2cm x 1cm pieces.

The squash cut into 2cm wheels
click to enlarge

Slice the ginger thinly, or grate it if you’ve kept it in the freezer. (Note: keeping peeled ginger in the freezer is a really good idea. It keeps for ages and can be grated easily whilst frozen)

Melt 150gm of butter in a large pan, add the squash and ginger and stir with a wooden spoon to ensure everything is covered with butter.

Cover the pan and cook gently for 10 minutes, stirring every two minutes to keep everything covered in butter.

After these ten minutes are up, add just enough stock to cover the squash and cook until the squash is just soft.

Remove the pan from the heat and allow it to cool down a bit before liquidising really well. If it’s too thick, add some more stock or fresh milk. Provided you’ve liquidised it well there’s no need to sieve this soup.

Serving the Squash and Ginger soup
The Squash and Ginger, basted with butter, before the stock is added
click to enlarge

Pour the soup into a clean pan and reheat – do not boil – and add the rest of the butter. Stir well, adding salt to taste. (Note: don’t add pepper since it’s black specs will detract from the look of the soup)

Pour into warm bowls.

Place a small dollop (a Play d’eau technical term) of crème fraiche on the top of each serving and a small sprinkling of finely chopped coriander.

Each person should have six Soldier Croutons.

Additional touches
  • Once liquidised, allow the soup to develop its flavour in the fridge for 24hrs – if you can wait that long!
  • Drizzle some Truffle Oil on each serving before adding the coriander. Brings a earthy depth

This soup is also great as an Amuse Bouche, served either hot or cold without the croutons. Keeps well in the freezer.

So, so simple, yet so, so beautiful.

Piers and Lin
from the Galley of
Play d’eau
Fleming 55

You can get in touch with us any time by using our Contact Form.