The offending anode bolt was knocked out click to enlargeIn cleaning the bilges I’d found a slight weep from one of the four bolts used to secure the two main anodes to the hull. Its washer was rusted leaving a slight rust stain where water must have oozed from the bolt and dribbled into the bilge. The concern was if the hull was wet from the water ingress.
Up, up and away
On Monday at 1630, Play d’eau took the short cut from Beaucette Marina to St Sampson’s and went up in the world as she was lifted by M&G Engineering in their 75 ton hoist to have the offending anode bolt knocked out, the hull checked for moisture content and a new bolt bedded in.
At the same time, we would take advantage of the lift to check the anodes and clean the trim tabs which had grown the most magnificent, yet embarrassing, seaweed beards.
The offending anode bolt
The offending bolt was knocked out and thankfully, it was clean and bright with no sign of any water ingress at all. It appears that the washer had had its anodising scratched as its nut was tightened causing it to corrode in the salty atmosphere of the bilge. Knowing the integrity of the hull had therefore not been breached, we wouldn’t have to suffer the expense of keeping Play d’eau on the hard for days if not weeks to dry out. What a relief.
Note 1 to self: Cover the exposed nuts and bolts on the inside of the bilge with white grease to prevent a return of worrying corrosion. The new bolt, greased up to prevent corrosion recurring click to enlarge
Play d’eau’s other anodes
When Play d’eau was lifted in February we checked all 12 anodes and it was only the two prop shaft anodes which needed changing.
And now with her in the strops, all looked OK except for the two on the prop shafts. After just four months they’d almost been completely eaten away which was most unusual. Maybe the reason for the rapid erosion was that we’d used MG Duff’s new aluminium anodes rather than zinc, as M G Duff had recommended.
Note 2 to self: If aluminium was the reason the shaft anodes had worn so quickly, I must use twin anodes or more on both shafts to get a full year’s use out of them – or better still, find zinc anodes again.
The Beard
The hull looked really good with almost no hint of fouling at all. But the trim tabs were another story. They were sporting a truly magnificent full set of whiskers.
The reason for this became evident when they were removed; the anti-fouling had been flaking off leaving bare metal. Far too much of a temptation for the Beaucette Marina seaweeds.
Note 3 to self: Next lift-out, take the trim tabs back to bare metal and start again.
Happy cruising!
Piers
from the Engine Room of Play d’eau
Fleming 55
In just four months the trim tabs had grown magnificent beards of Beaucette seaweed click to enlarge
It looked so beautiful, but it had to come off click to enlarge
The aluminium anode on the port prop shaft had virtually gone in only four months click to enlarge
The aluminium anode on the starboard prop shaft had almost disappeared completely click to enlarge
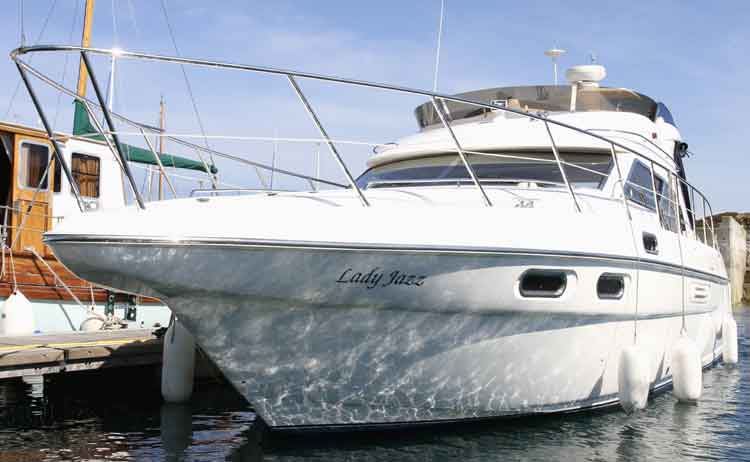
Lady Jazz, Sealine F43, owned by Bernie and Lynn click to enlargeLogging into ybw.com a week ago to catch up with news on the Motor Boat Forum, I found ‘Thepipdoc’ had come into Beaucette Marina the previous evening on one engine having had an engine failure part way across the English Channel.
Wandering around to his berth from Play d’eau the next morning I found Lady Jazz, a gleaming Sealine F43, and met Bernie and Lynn. Bernie, who had only just woken up (it was 9 o’clock already!) told me, ’12 miles north of Beaucette Marina the starboard engine conked out and we slowed to 9 knots. At this speed we were rolling around a bit and the last thing I wanted to do was poke around the engine room so we carried on to Beaucette Marina where Ricky (Marina Manager) came out and guided us in.’
Bernie carried on to tell me that the starboard engine’s Racor filter bowl looked a murky grey, that the starboard tank was only a quarter full and that fuel additives had not been used in the one and a half years Bernie had owned Lady Jazz. This seemed to point to a potential diesel bug problem. Changing the Racor filter click to enlarge
Changing the Racor filter
Later that morning, Bernie changed the Racor filter, bled as much air from the system as possible and after a good cranking the engine started and ran perfectly at 2,000 rpm for 20 minutes. All appeared good news so Bernie cast off to motor the short distance to St Sampson’s harbour to fill up with diesel delivered by a Rubis tanker.
But one mile out of Beaucette Marina, Lady Jazz’s starboard engine failed again leaving Bernie to limp into St Sampson’s where he changed the starboard engine’s fine filter just in case that was blocked as well. Cranking the engine to bleed air from the system, it started. Success? Sadly no. Ten minutes later it began hunting, and stopped.
Confined to the engine room
So, with fuel in the tank, clean Racor and fine filters, something else had to be happening.
Spending the next two days in the engine room, Bernie swapped the fuel supply pipes to see if the port engine would run from the starboard tank. It did. So the tank and its immediate pipework to the starboard fuel shut-off valve was good.
So by deduction, there had to be an obstruction somewhere between the starboard fuel shut-off valve and the starboard engine’s Racor filter.The offending fuel shut-off valve which had to be removed and disassembled click to enlargeUsing a foot pump and a Pela suction pump on the potentially offending length of pipe, Bernie (annoyingly) found it was clear. But thinking about it, that could mean only one thing – the problem had to be with the shut-off valve itself.
That’s the culprit
Having disconnected the fuel valve assembly board completely from its associated pipework and been covered in diesel whilst doing it, Bernie attacked the valve. Lo and behold, it was jammed with something looking like material which took an age to pick out. Was it a bit of rag? Was it a cigarette butt?
But having re-assembled the board, the engine wouldn’t start. It wouldn’t even crank. Why? With constant cranking over the last few days, the started motor had burned out.
At this point, St Sampson’s Marine and General stepped up to the plate and in no time at all had provided a new starter motor at almost the same cost as a rebuild. Perfect!Problem resolved, Lynn and Bernie can enjoy the rest of their holiday click to enlargeWith the new started fitted, the fuel shut-off valve cleaned out, all eight pipes of the fuel valve assembly board reconnected, fuel in the tanks together with a good dose of Grotamar 82 additive, the starboard engine was obviously relieved and burst into life.
The rest is history.
Piers
from the Engine Room of Play d’eau
Fleming 55
You can get in touch with us any time by using our Contact Form.
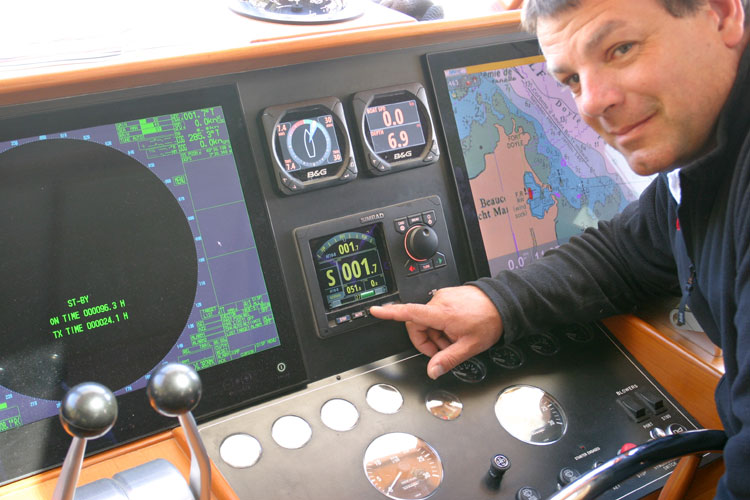
Andy Craig of MEI resolves the Simrad AP 70 autopilot problem click to enlarge
In my post ‘The Finishing Touches’ I hinted at a major problem between the Simrad AP70 autopilot, the Furuno satellite compass and NavNet3d electronics, and that I’d report on it once it had been resolved.
As the customer, I was faced with having to leave for our summer cruise to the west coast of Brittany with no autopilot. Not a good idea, especially having spent the winter refurbishing Play d’eau which had been featured by MBY in their April 2013 issue.
Who were the stars in understanding customer service and resolving this customer issue? Andy Craig and Jim Staig of MEI Ltd whose website is Electronics on Board.
The problem
Whilst in Auto, the Simrad AP70 autopilot would go into alarm every few hours stating the steering compass information had been lost.
This would sometimes be amplified in nuisance by the Simrad AP70 refusing to go into Auto or Nav at all, for the same alarm reason.
The Customer Service
Bear in mind that all the Furuno kit is tried and tested whilst the Simrad AP70 is the new boy on the block with Play d’eau having the second.
Also bear in mind that Customer Support at Simrad relies on one person alone, who has to cover every product made by Simrad, Lowrance B&G and Navico.
So what should be said about Simrad’s response? Let’s just say that the Simrad AP 70 was a new product and had not had the benefit of months of sea testing in anger, and their Customer Service desk (one person) is heavily overworked.
What did MEI Ltd do?
MEI was brilliant. They said the words any customer would want to hear. ‘Leave it to us, Piers, and we’ll sort it – we will.’
So last week, I collected Andy Craig from St Peter Port’s Condor ferry terminal and we drove to Play d’eau.
Before tasting his coffee he was already laying out his plan of attack. ‘First, we’ll blueprint what equipment is outputting what sentences in case of data collision. Then we’ll install a new cable from the satellite compass direct to the Simrad AP 70 autopilot to by-pass the Furuno NavNet3d, and finally,’ he added with a wry smile, ‘I have a software update from Simrad to install, yet no one at Simrad seems to know what the changes to the software are….’
Has it worked?
It appears to have been successful. Why do I use the word ‘appears’? Because I’m naturally cautious, nothing else.
So full marks have to go to MEI Ltd who kept on the issue and made sure they resolved it.
MEI Ltd
MEI Ltd are authorised Dealers for Furuno, Simrad (Navico), Raymarine, Garmin, Intellian, ICOM, KVH, Actisense, and the list goes on.
MEI regularly installs on leisure and commercial vessels in the UK, the south of France, Majorca, Minorca, Antigua and Corfu.
Like many other boaters, we’ve been caught out by fog. We were in the Channel Islands anchored in Havre Gosselin bay on Sark’s west coast. It was a mid-summer hot day with only a gentle breeze from the north and clear blue skies. Soon after lunch, our eldest son pointed towards the Gouliot Passage and asked, ‘what’s that?’ In just a few minutes we knew. We were completely engulfed in thick fog.
The UK magazine Motor Boats Monthly (MBM)
In 2005 I was asked by Motor Boats Monthly (MBM), to attend a Radar Course and write an article on Radar and its use in Restricted Visibility. The course would be taken by (the late) Robert Avis who had command experience of eleven warships and six superyachts, and more than 350,000 miles at sea.
I have to admit to feeling very small after just a few moments of hearing Robert speak. It appeared that my knowledge of using radar at sea was wrong and very mis-informed. Furthermore, in talking about MARPA Robert showed how almost all leisure radars present potentially incorrect information to the extent that radar assisted collisions had been the result.
Anyone been caught out by fog?
Robert started with this simple yet direct question. After a moment of hesitation almost all of us put our hands up. Asking how we used our radar sets, most answered ‘Head Up’, and after even more hesitation, most admitted to using radar as a means to dodge potential traffic.
‘Well,’ concluded Robert. ‘The good news is you’re still alive,’ (muted laughter), ‘and the better news is that by the end of this course you will have learned how to use radar properly.
‘First, you’ll learn that the normal COLREGs change when you can’t see the opposing traffic and that Rule 19 comes into play instead. We’ll learn this rule so you can take the correct avoiding action.
‘Second, you’ll learn the best way to set your display to assist you in making the correct decisions.
‘Third, you’ll learn that MARPA be can a really dangerous feature unless you understand why the information it presents can be very misleading.’
To say Robert had out attention would be an understatement.
Radar, MARPA, and Radar Assisted Collisions
What do I need to know to avoid a collision?
To take the correct avoiding action, you need to know two things. Is there a risk of collision, and in which direction is the target pointing?
My radar has MARPA – what is it?
MARPA is an aid to assessing collision risk that you’ll find on many leisure radars. MARPA (Mini Automatic Radar Plotting Aid) is the less capable version of ARPA (Automatic Radar Plotting Aid ) that’s been on commercial shipping for many years.
Can I rely on MARPA?
No. It’s only an aid and the information it provides can be wildly inaccurate since it’s fully dependant on the type of speed and heading inputs your radar utilises which in turn defines if it’s Sea Stabilised or Ground Stabilised.
So what’s the difference between Sea and Ground Stabilisation?
Given the effects of tide and/or wind, your boat’s speed through the water (STW) can differ significantly from your GPS speed over ground (SOG). For the same reason, your boat’s heading (BH) can differ significantly from your GPS course over ground (COG). These differences amplify the slower you travel and/or the stronger the tide and wind.
For example, moving at 6kts into a tide of 4kts shows a STW of 6kts but a SOG of 2kts.
Unfortunately, most leisure radars utilise GPS SOG and COG making it ‘Ground Stabilised’. Calculating collision risk in this way has been attributed as a significant factor in ‘radar assisted collisions’ on a number of occasions.
For MARPA to be of use and not offer potentially misleading and inaccurate information, your radar must use boat heading (BH) and speed through the water (STW). This is called being ‘Sea Stabilised’.
What do the IMO, MAIB and MCA say about this?
The IMO (International Maritime Organisation), MAIB (Maritime Accident Investigation Branch), and MCA (Maritime Coastguard Agency) all recommend Sea Stabilisation for collision avoidance.
The MAIB’s report on the yacht Wahkuna collision in 2003 makes chilling reading (see below). Their comment is “Yachtsmen should be aware of the characteristics and limitations of the radar set they are using, and … Sea Stabilisation should be selected for anti-collision use.”
How do I check if my radar is Sea Stabilised?
Does your radar manual have any mention of Sea or Ground Stabilisation? If not, contact the manufacturer or supplying installer to clarify.
You can also run your own test. On a day when there is no wind,
Step 1 – Choose somewhere where you know what the tide is doingStep 2 – Target a fixed object such as a buoyStep 3 – Stop the boat and become stationary in the water (i.e., not making way)Step 4 – Locate the buoy and choose a range scale to fitStep 5 – Target MARPA, and wait….
Your radar is Sea Stabilised if MARPA shows the buoy moving at the speed of the tide, but in the opposite direction from the tide.
If MARPA shows the buoy is stationary but the radar has an apparent speed for your vessel, the radar is Ground Stabilised.
What’s needed to make my radar Sea Stabilised?
Provided your radar can handle Sea Stabilisation, it needs a STW data source usually taken from your boat’s paddle wheel log, and a boat heading source with a fast refresh rate of some 40Hz or better, usually taken from a flux gate, or gyro-compass.
Why does the compass need such a fast refresh rate?
Simply because when turning, or in an emotional sea, your boat can alter heading faster than most compasses can cope with, causing MARPA calculations to lag and become confused. Bear in mind that few radars have fast processors.
Applying COLREGs Rule 19
My radar has features called relative and true motion. What’s that about?
To cut to the chase, relative motion shows the moving relationship between you and other vessels. If the target’s relative trail (synthetic after-glow) or vector, points towards the centre of the screen (you) and its range is decreasing, a risk of collision exists.
When you know you have a potential risk of collision, you need to decide what avoiding action to take. For this, you need to know the target’s aspect – the direction it’s pointing if you could see it. This can be very different from the direction it’s travelling.
For this, you need to know its ‘true vector’ which gives an indication of the direction the target is pointing (its aspect) which is exactly what you need to know for the correct avoidance action (rule 19d – see later).
Therefore, for collision avoidance, it’s best to set your radar to relative motion, and only use true vectors to check a vessel’s aspect – the direction it’s pointing.
What action do I take if my radar suggests I’m on a collision course in restricted visibility?
Remember that the COLREGs for restricted visibility are very different from those when you are sight of other vessels. Rule 19 takes over.
What should I use if MARPA can’t be relied on?
The good old fashioned Electronic Bearing Line (EBL) is by far the best indicator of a risk of collision. It’s the electronic equivalent of the constant bearing line technique you use in good visibility when watching a vessel bear down on you with your mark one eyeball.
Even if properly set up, what other factors affect MARPA?
MARPA takes time to calculate the selected target’s details. Allow it to settle. It is not helped if,
your heading and speed change.
if the target starts changing its heading or speed.
Errors increase significantly if,
either one of you is travelling slowly or the tide or wind is strong.
the sea state is emotional – anything but smooth.
What about AIS?
High caution is also required with AIS data. The information provided is only Ground Stabilised and subject to the accuracy (or lack of) of the transmitting vessel.
Two pics which may help…
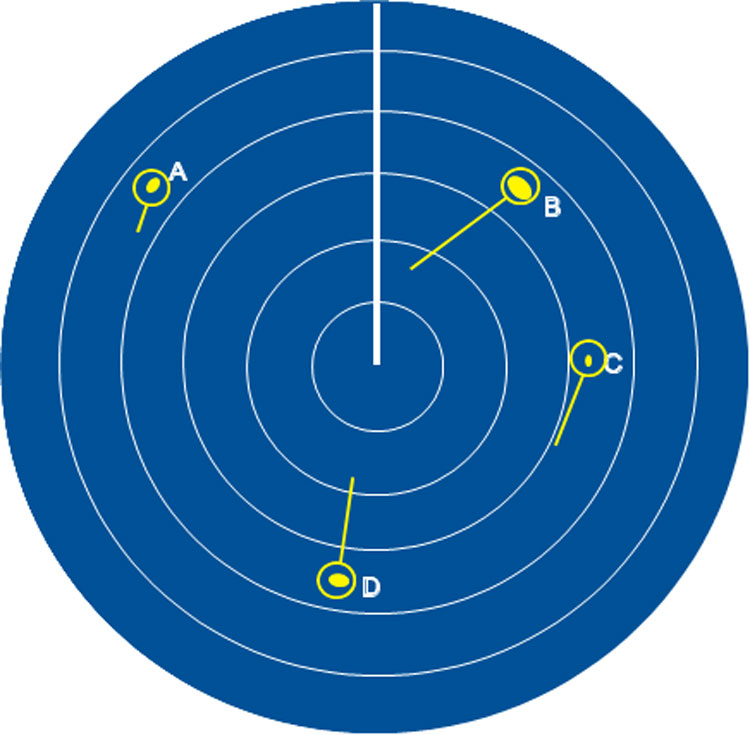
Assume your course is Northerly, at 8kts and that there’s an Easterly tide running at 2kts.
The first image is Ground Stabilised. Which vessel poses the threat? What is MARPA telling you? The second image is Sea Stabilised. Which vessel poses the threat?
Ground Stabilised In this Ground Stabilised display which target is the threat? click to enlarge
Sea Stabilised In this Sea Stabilised display which target is the real threat? click to enlarge
Yacht Wahkuna and P&O Netlloyd Vespucci
In poor visibility, the vessels collided in the English Channel. Both had detected each other by radar at 6 miles. Both skippers misinterpreted the information their radars gave them and both took the wrong action. Minutes later, the vessels collided. The first 3m of the Wahkuna’s hull were demolished and she was dismasted, yet the master of the container ship was unaware a collision had occurred. The yacht’s crew abandoned to a liferaft for 5½ hours before being rescued.
The MAIB concluded some contributory factors to the accident included:
Misunderstanding by the yacht’s skipper of which COLREGs apply in fog
The inability of the yacht’s skipper to use radar effectively
Over-confidence in the accuracy of the Vespucci’s ARPA
Both skippers taking the wrong action
The report stated the Vespucci’s radar was Ground Stabilised, the incorrect format for collision avoidance. It should have been Sea Stabilised in accordance with IMO guidance.
The report emphasised that whenever radar equipment is fitted on board any type of vessel, that watchkeepers are fully versed and trained in its use and capabilities. The fitting of radar and (M)ARPA, without knowing its limitations or how to use it, can contribute to accidents.
Rule 19 of the COLREGs applies when in restricted visibility
What is Restricted Visibility?
Simple – “when vessels are not in sight of one another.”
What action should I take?
We have learned that in restricted visibility, using radar as a means to ‘dodge’ targets is wrong and in itself has led to accidents. Instead, we apply Rule 19.
So what does Rule 19 tell me to do?
There are two main differences. First, Rule 19 shows there’s no such thing as a stand-on vessel in restricted visibility and that the onus falls on both vessels to take avoiding action “in ample time”. Second, this applies even if you are being overtaken where it remains your responsibility to take avoiding action.
What is “ample time?”
Robert advised us that in open seas a commercial vessel would expect to come no closer to other traffic than 2 miles and that 2 miles would be a good guideline to use. Other commercial operators may dictate a greater distance.
So what does Rule 19 say?
First, if you detect another vessel by radar alone, take avoiding action in ample time provided that if you are going to change course, avoid the following as far as possible:
a) an alteration of course to port for a vessel forward of the beam, other than for a vessel being overtaken;b) an alteration of course towards a vessel abeam or abaft the beam.
Rule 19 of the COLREGs click to enlarge
Second, except where it has been determined that a risk of collision does not exist, every vessel which hears the fog signal of another vessel apparently forward of her beam, or which cannot avoid a close-quarters situation with another vessel forward of her beam, shall reduce her speed to the minimum at which she can be kept on her course, taking all her way off if necessary and in any event navigate with extreme caution until danger of collision is over.
What sound signals should I make?
Rule 35 defines which sound signals should be made in restricted visibility. For leisure vessels, these are mainly,
One prolonged blast
Power driven making way
At least every 2 minutes
Two prolonged blasts
Power driven, under way but not making way (2 secs between blasts)
At least every 2 minutes
One prolonged and two short blasts
Sailing of Fishing vessel, not at anchor
At least every 2 minutes
A prolonged blast is 4-6 seconds, and a short blast is about 1 second.
What’s the moral of this story?
Using Radar authored by Robert Avis click to enlarge
Unless you know without doubt that your radar is Sea Stabilised, use your EBL, know COLREGs rule 19 and how to apply it, don’t trust MARPA, and remember that even at best, MARPA is only an aid and not a get out of jail free card.
‘Using Radar’, author Robert Avis
This is an excellent reference book and written in typical Robert Avis style. I’d recommend ‘Using Radar’ as a ‘must have’ for anyone who’s ever likely to be caught out by fog.
Martin at Beaucette Marina click to enlargeDespite the extensive research Lin and I did when specifying the electrics and electronics refit for Play d’eau, operational niggles came to light as soon as we started cruising and living on board.
Apart from one major problem involving the compatibility of the Simrad AP70 autopilot and the Furuno electronics (which will be the subject of a separate posting once it’s been resolved), most niggles were small and trivial in comparison. For example, the default settings for which video camera should be displayed on which screen when cruising; a link from the TV to the saloon’s main sound system; the installation of a Wi-Fi unit to connect to our shore telephone line which carried ADSL as well; establishing why the Navtex had stopped receiving messages, and so on.
So, last Friday, Martin, Play d’eau’s ‘resident’ electronics installer, arrived on one of Guernsey’s Blue Island ‘planes. ‘It was a tiny aircraft and there were only six passengers,’ said Martin. ‘It took 25 minutes, and I loved every one of them!’
Driving straight to Play d’eau Martin began attacking the list. Good progress was made until we needed some RG59U video cable. The only hope was the Guernsey marine electronics company RES but it had closed for the day. However, we sent an email from their website and within moments we had a telephone call. ‘Yes, we have some in stock,’ said Robin. ‘Come by the shop in the morning – we open at 0830.’
By the time Martin had to catch his return flight the next day, all niggles had been resolved apart from the Navtex which needed a new aerial.
Did Martin like his time in Guernsey? ‘It’s an awesome and beautiful place,’ was Martin’s comment. Says it all, doesn’t it?
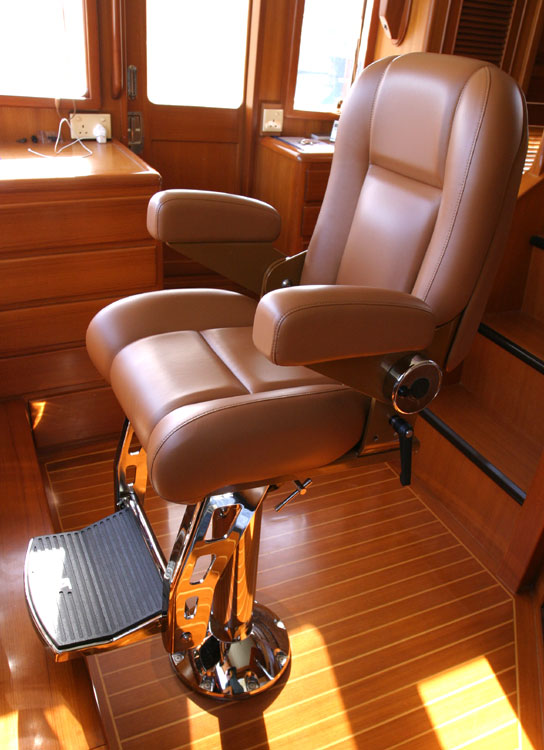
The new STIDD helm seat click to enlargeThe original helm seat was fine but had two drawbacks which, over time, had really begun to irritate. First, it creaked at every slight movement of the boat whilst cruising, and second, its ‘real estate’ footprint meant squeezing between it and the table to reach the port side of the Pilot House.
After chatting on the Fleming Owners forum, the answer had to be an Admiral Luxury Low Back Slimline helm seat from STIDD.
Fitting was really easy. The original seat was unscrewed from its stainless steel base plate which was itself bolted through the floor to a large aluminium plate. Since the STIDD had a larger diameter base, a new plate was fabricated to fit the same bolt holes.
Once the new base was installed, the STIDD instructions were easy to follow and in just 30 minutes the new seat ‘was born’. Its engineering is superb. The movement fore/aft, swivel, height and backrest angle, is so smooth. Beautiful.
The result – perfection! What a great seat. Bonus – no creaking and a smaller foot print.
Piers
from the Pilot House of Play d’eau
Fleming 55
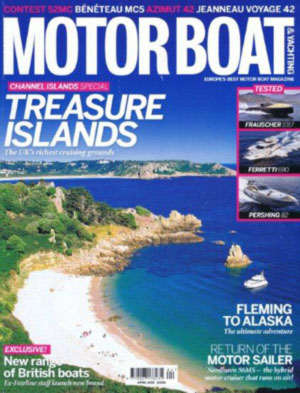
Motor Boat & Yachting April 2013 edition click to enlarge
After 10 years of glorious cruising, we decided it was time to upgrade Play d’eau’s electronics.
We spent considerable time researching which equipment, suppliers and installers would be used, and work finally began in the winter of 2012 and finished before the season started in 2013.
As you imagine, this became more than just an electronics upgrade, and involved the fabrication of a new pony mast to fit on the radar arch, a galley upgrade, satellite TV, bimini cover, IMO approved horns and bell, as well as new joinery works.
The upgrades were detailed in an article entitled Owner Upgrades in the April 2013 edition of Motor Boat & Yachting.
Owners Upgrades(Note – there are many pics at the bottom of this page)
It was a simple matter of creep. It wasn’t really planned, it just happened. Are we pleased with final result? Without doubt. Would we have chosen a different route if we’d known the cost before starting? No.
Play d’eau, our 2003 Fleming 55, would soon be 10 years old and we felt we owed her a face lift. Although we’ve cruised from Holland to the Scillies, and the Normandy and Brittany coasts, we have ideas to cruise much further afield with the Baltic, Sweden and Norway in mind.
Play d’eau in the Gouliot Passage between Sark and Brecqhou in 2003 click to enlarge
Externally, although she still looked gorgeous, we knew there were gel coat defects and some dull areas. Parts of the teak decking needed attention as well, and the flybridge perspex wind deflector had become quite crazed. She’d served us so well we felt it was time to show some extra love in return. The question became who could we trust to do a really good job?
A phone call to Fleming Europe was all it took. David Miles immediately recommended Julian Wilmot of GRP Boat Repairs. ‘I use them for all Fleming external works,’ explained David. ‘Julian will do a superb job, achieving a 100% colour match with the gel coat as well.’
Talking with Julian we began to feel confidence. Yes, the gel repairs could all be done and the GRP would be restored to its original gleaming finish. The teak could also be brought back to its original state. ‘But how?’ I asked Julian. ‘I’ve seen so many horrid so called teak restorations which turn teak yellow – or worse.’ Smiling, Julian replied. ‘We use the same treatment whether it’s on a small boat or one of the super- or mega-yachts we work on. The Wessex teak cleaning treatment. Trust me.’ Hmmm. Well, we agreed a scope of works and work began on correcting 138 GRP defects, restoring the shine and yes, every bit of teak was brought back to its original wondrous finish.
‘After’ Play d’eau’s name board in gold leaf on teak (Photo courtesy Lester McCarthy & MBY) click to enlarge
Whilst this work was progressing our minds began thinking about the inside of Play d’eau. For example, the ten year old electronics and the wish list of changes to which we’d been adding over time. Maybe we should just update the chart plotter and radar? We’d always wanted a sea-stabilised radar for accurate MARPA and target aspect, and for this there was only really one manufacturer available, Furuno. (Note: I’ve added a separate post on the use of radar in restrictive visibility, here.).
A call to Jim Staig, whom I’ve known for many years and who is an undoubted electronics genius, of MEI Ltd, and I was soon in Furuno UK’s Portsmouth HQ discussing their systems with Furuno guru, Dan Conway. Seeing the Furuno 2117 radar was fully sea-stabilised, there was no contest. The NavNet3D chart plotter was its counterpart, and with both being black box we could use the new 19” Hatteland X-series screens with a 12” high bright Hatteland on the fly-bridge. What could be better? The order was placed.
But then, of course, the instruments and auto-pilot would look ‘old’. So the hunt began for replacements with a Simrad AP70 autopilot complete with pump and rudder reference unit being chosen and B&G Triton instruments for depth, log and wind speed.
‘After’ The FLIR thermal imaging camera looking from Haslar marina to the east side of Portsmouth (Photo courtesy Lester McCarthy & MBY) click to enlarge
Working on the principle of ‘see and be seen’, we replaced the single band Sea-Me with an Echomax dual band active radar reflector, and added an Easy TRX2-1S Class B transceiver with the ability to turn its transmissions off when in crowded boating areas.
And when we thought that was that, the fun really started.
Rather than the standard 4’ scanner, Furuno recommended the 6’ 6” scanner, which would mean the radar arch was overcrowded. To overcome this, Julian recommended an additional ‘pony’ mast which he’d had fabricated by BD Marine Ltd for previous Flemings in matching gel coat colour. On the positive side, we would then have space to fit an image stabilised FLIR thermal imaging camera so at last we could travel at night with the bonus of seeing the dreaded lobster pots in pitch black darkness at over a kilometre away. The drawings for the pony were created, they looked good, so the order was placed. Again, perfect – let’s go.
Sea-stabilised radars need a really accurate boat heading to refresh the radar, rapidly. Lo and behold, we learnt the Furuno satellite compass could do just that so one was added to the ever growing shopping list. To back it up, we installed a new Furuno PG500 flux-gate compass as well, just in case. A good speed through the water was also needed, and despite looking at Doppler systems, Furuno’s recommendation was simply to use a good old fashioned (and inexpensive) paddle wheel log. An Airmar DST800 was chosen.
Whilst about it, we thought it would be a good idea to fit some video cameras mainly to enable docking from the Pilot House where there are blind spots. A call to Simon Coleman of Boat Electronics and Electrics Ltd (BEE Ltd) soon sorted the choice of cameras to cover the port side, starboard, and aft, and one was added for the engine room as well. That meant we needed two more 12” Hatteland screens for the Pilot House…. Simon also provided expertise in how the cameras should be wired into the screens to enable any camera to be viewed from any screen. Genius.
‘After’ The flybridge wind deflector had become crazed and it was replaced (Photo courtesy Lester McCarthy & MBY) click to enlarge
Having chosen the new electronics, who would fit them? Again, talking with David Miles, he recommended Martin Janning of Koenig Marine who’d worked on many Flemings in the past (including Play d’eau ten years previously!) and knew the cable runs inside out.
The next major problem was how to fit the screens and instruments in the Pilot House consoles without them looking like a hash job. Enter, stage left, Mickey Dovey, master joiner, and I mean master joiner, who had worked on Flemings for many years and like Martin, knew their every Fleming nuance. He recommended removing the whole main console to refurbish it to its original state and to cut in all the instruments afresh. Everything would look brand new and bespoke with the added benefit that Martin would temporarily have easier access to the wiring looms not only to make them beautiful, but to remove all the redundant cabling as well.
Meanwhile, a new set of shiny and good looking Kahlenberg D-1 air horns were installed to replace the older (and non-IMO compliant) Buell horns. Boy, do they sound superb, and, with a Kahlenberg controller, all the required fog signals could now be handled automatically.
By now, the pony was fitted and most of the electronics had been installed. That’s when the last issue was found; the existing bimini cover didn’t fit anymore – the pony was in the way. However, a call to Jim of JB Yacht Services had him on board in a trice, a re-design agreed, and a lovely new bimini installed.
‘After’ A new wine cupboard in place of the ice maker (Photo courtesy Lester McCarthy & MBY) click to enlarge
So, what of the other non-electronic changes? Mickey replaced the slow three burner electric hob with a fast De Detrich four burner induction hob which meant cutting the existing granite to take the larger footprint and refitting the pan holders. Mickey also modified a saloon cupboard to a wine drawer and shelf, installed a new TV, fabricated a folding teak table top in the third cabin for use as a study and created a beautiful chopping board to fit over the new hob to protect it when not in use.
Whilst adding the pony mast, we added an Intellian i3 satellite TV dish, balancing the look of the radar arch with a dummy Intellian ‘poached egg’ on the other side which covered the Navtex aerial. Both had colour matched cake stands fabricated for them.
Reaching the end of the works, the original eight station intercom was replaced with a Panasonic telephone system with eight new handsets from du Pré plc. No more buzzing, no ability to eavesdrop, and the facility to call all extensions if trying to locate someone. We also added a Premi-cell to provide a dial 9 capability from any handset for outside calls. Job done.
Finally, the compasses were swung by Robinsons. Both were wildly out but Joanna reduced the deviation to less than 1 degree. Success.
‘After’ The new helm looking (almost) like a glass bridge (Photo courtesy Lester McCarthy & MBY) click to enlarge
So what’s still on the wish list? A STIDD low profile deluxe helm seat and a Webasto hydronic heating system. Maybe, just maybe….
So were we let down by anyone? No, apart from an issue with the integration between the Simrad AP70 and the Furuno electronics which took time to fix. Did the trades all live up to their word and play well with one another? Yes. Did it take longer than we thought? Yes. Was it a problem? Not when we saw the brilliant results. And yes, she really does look ten years younger.
The inevitable question is should we have changed Play d’eau for the latest model 55, or even a new 58? We can only answer like this. We know Play d’eau inside out. Every square inch of her, and in as much as we’ve treated her well, she’s treated us well. Why divorce and start again? The only attraction of the 58 would be its significant additional space. But seeing it’s only for the two of us did we really need this extra space and was it worth the additional cost? No. Instead we worked on modernising Play d’eau and making her fit for extended cruising for the next ten years – at least.
New Kit(PH = Pilot House; FB = Fly bridge)
Radar
Furuno FAR2117BB radar, 6’ 6” scanner. Controller for PH
Chart Plotter
Furuno nn3d MFDBB chart plotter. Controllers for PH & FB
PH Screens
2 x 19” and 2 x 12” Hatteland series X screens, optically bonded
FB Screen
1 x Hatteland 12” series X High Bright screen, optically bonded
Autopilot
Simrad AP70 autopilot. Controllers for PH & FB
Instruments
2 x Simrad Triton instruments (Depth, Speed through water, Wind). PH & FB
Video cameras
4 x cameras. Port, stbd, aft and engine room
Telephone system (PABX)
8 station Panasonic KX-TEA 308 PABX, complete with 8 handsets and Premi-cell
Kahlenberg D-1 twin air horns, 134 dB (IMO compliant & certified)
Horn controller
Kahlenberg M511C
Bell
Kahlenberg 7”, cast in bell bronze and engraved (IMO compliant & certified)
Flood light
Imtra PowerLED flood light C2-139HT
Radar arch lights
Imtra Hatteras recessed ILIM 31301 LED
Voltage smoothers
Alphatronix for smooth supplies to the FLIR, PABX and video cameras
Satellite TV
Intellian i3, with a Panasonic TXL24X5B TV, and Humax 500Gb decoder
AIS
Easy TRX2-1S Class B transceiver, c/w transmit on/off switch
Boat covers
Bimini and console covers
Hob
De Detrich 704v induction hob
Hob cover
A teak chopping board
Teak decking
Complete restoration (which had become bleached with age – like me!
Saloon cabinetry
The ice maker cabinet converted to a wine drawer and shelf. TV cabinet
Bunk cabin cabinetry
Folding desk top table added
Trades
Fleming Yachts
David Miles
Fleming Yachts Europe
02380 337289
GRP and restoration work
Julian Willmott
GRP Boat Repairs Ltd
07774 141913
Boat electronics supplier
Jim Staig
MEI Ltd (Port Solent)
02392 326366
Boat electronics manufacturer
Dan Conway
Furuno UK Ltd
02392 441000
PABX and Premi-cell
Ben Johnston
du Pré plc
01635 555555
Installer & perfectionist
Martin Janning
Koenig Marine Ltd
07540 390414
Master Joiner & woodwork restorer
Mickey Dovey
Mickey Dovey
07748 906413
Marine horns and bells
Toby du Pré
Kahlenberg UK Ltd
01635 35353
Hatteland screens & FLIR
Toby du Pré
du Pré Marine Ltd
01635 888 888
Stainless & metal fabrication work
Brad Smith
B D Marine Ltd
02380 220294
Video cameras (plus ‘bits’)
Simon Coleman
BEE Ltd
01292 315355
Boat Covers
Jim Baumann
JB Yacht Services
01489 572487
Compass adjusting
Ms Joanna Robinson
Robinsons Compass Adjusters
02380 453533
Wind deflector perspex
Carol Austin
Sunlight Plastics Ltd
02392 259500
Piers and Lin
from the Engine Room of Play d’eau
Fleming 55
Photo libraryPics of the new bimini to follow
‘Before’ The centre main console click to enlarge‘Before’ The centre main console – live click to enlarge‘Before’ Port main console click to enlarge‘Before’ Starboard main console click to enlarge‘Before’ Upper port console click to enlarge‘Before’ Upper starboard console click to enlarge‘Before’ A typical GRP defect and poor teak condition click to enlarge‘Before’ Radar arch – aerials left to right are,
‘During’ The pony mast begins its fabrication in aluminium click to enlarge‘During’ The aluminium pony mast before being covered in GRP and gel coat click to enlarge‘During’ The whole helm area is being worked on click to enlarge‘During’ Main console completely removed click to enlarge‘During’ Martin, inside the stbd electrics bay, begins re-wiring click to enlarge‘During’ The sat compass and AIS are installed behind the pilot house bookcase click to enlarge‘During’ Port electrics bay showing the rewiring ‘in progress’ and the nn3d black box click to enlarge‘During’ Starboard electrics bay showing the rewiring ‘in progress’ click to enlarge‘After’ The new pony mast, fully loaded, complete with the Intellian i3 domes (Photo courtesy Lester McCarthy & MBY) click to enlarge‘After’ Another view of the new pony mast click to enlarge‘After’ Upper pony mast showing the sat compass and FLIR thermal imaging camera (Photo courtesy Lester McCarthy & MBY) click to enlarge‘After’ The aft view of the pony mast, its support strut and the small round aft facing video camera (Photo courtesy Lester McCarthy & MBY) click to enlarge‘After’ The new Kahlenberg ships’ bell cast in bell bronze The name was also cast in the mould and not simply engraved click to enlarge‘After’ The gorgeous new Kahlenberg D-1 horn in need of a clean! (Photo courtesy Lester McCarthy & MBY) click to enlarge‘After’ Pilot House AC wiring bay (Photo courtesy Lester McCarthy & MBY) click to enlarge‘After’ Pilot House DC wiring bay (Photo courtesy Lester McCarthy & MBY) click to enlarge‘After’ Piers at the helm (Photo courtesy Lester McCarthy & MBY) click to enlarge‘After’ The new main helm (Photo courtesy Lester McCarthy & MBY) click to enlarge‘After’ The Furuno FAR2117 radar uses a 19″ Hatteland display (Photo courtesy Lester McCarthy & MBY) click to enlarge‘After’ The centre console, showing the B&G instruments and Simrad AP70 autopilot (Photo courtesy Lester McCarthy & MBY) click to enlarge‘After’ The De Detrich 4 burner induction hob which is super-fast (Photo courtesy Lester McCarthy & MBY) click to enlarge‘After’ The hob laminated teak chopping board which sits on the pan holder rails (Photo courtesy Lester McCarthy & MBY) click to enlarge‘After’ The desk top deployed in the bunk cabin, measuring 88cm x 57cm when open. We use a small stool to sit on, and there’s good space for knees under the desk top click to enlarge‘After’ The desk top in the bunk cabin, folded up and completely out of the way. This allows the cabin to be used as originally intended as a two bunk cabin click to enlarge‘After’ The teak in the cockpit after renovation and before the fenders were changed! click to enlarge‘After’ The forepeak teak after renovation using the Wessex treatment click to enlarge‘Before’ Not part of the restoration, but we fitted three of these warp/cable tidies in 2004 – two for the aft warps and one for shore power click to enlarge
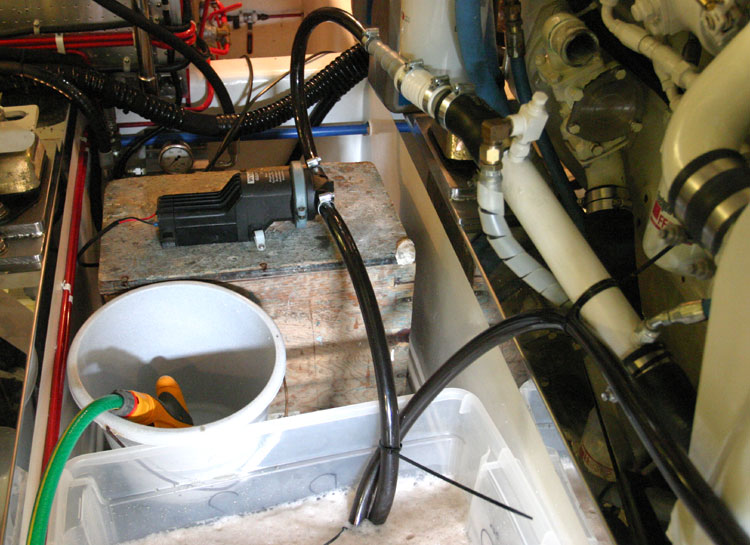
The Gulper pump connected to the tub of Rydlyme and the engine’s cooling system click to enlarge
After 7 years, Play d’eau’s engine logs were showing an increase in water temperature of some 5 degrees on each engine when at cruise rpm.
The most likely cause was a gradual build up of limescale in the tubes of the heat exchanger. Certainly, when squeezing the rubber hoses of the cooling circuit, they ‘crackled’ as the limescale crumbled.
Being short of time, removing the heat exchangers and sending them away for cleaning was not an option. Furthermore, it would not resolve the limescale problems in the rest of the cooling circuit.
So, after research on the web, I devised an alternative solution. I would ‘descale’ the complete cooling circuit of each engine by circulating Rydlyme instead of sea water.
Normally, sea water is sucked through a strainer by the sea-water pump where the impellor forces it into the engine’s cooling circuit and heat exchanger before it’s finally dumped overboard. Some of this sea water is bled off to be sprayed into the engine’s hot exhaust gasses to cool them.The OUT side of the Gulper connected to the start of the engine’s cooling circuit click to enlarge
My plan was to use a Gulper pump in place of the sea-water pump and a large tub of the dark brown Rydlyme in place of sea water. A pipe would connect the tub to the IN side of the Gulper with another to connect the OUT to the hose at the start of the engine’s cooling circuit.
Not to lose the Rydlyme overboard, I connected a pipe from where the sea water would normally discharge overboard back to the Rydlyme tub. Making the hose connections required a number of hose connectors which were all readily available at the local Chandlery.
The final preparation required the removal of any anodes since these would be attacked by the Rydlyme. In their place, I used blanking plugs.
Testing involved turning the Gulper on and checking for leaks using water from a tub. None was found. Now for reality. With the water replaced by Rydlyme the Gulper was started and soon the dark brown liquid was fizzing away as all the limescale was being eaten away.
It took about an hour per engine before the fizzing and frothing stopped indicating no lime scale was left. Checking that it wasn’t just that the Rydlyme was spent was simple – I dropped a piece of limescale into the Rydlyme. It fizzed showing there was life in the dark brown.The end of the engine’s cooling circuit connected to a pipe to return to the tub of Rydlyme click to enlargeOverall, the exercise took less than one day. Total success. Both engines had been fully descaled, the proof of which was a reduction in cruise water temperature to the original figure. Yes!
Piers
from the Engine Room of Play d’eau
Fleming 55
Dual controls for bow and stern thrusters click to enlarge
We always thought that having a bow thruster was an admission of inability to drive a boat properly. I mean, you should be able to use a combination of props and rudder, and/or a combination of this with your warps, shouldn’t you?
But it didn’t take too long before we realised the bow thruster was a total boon when there’s little room to manoeuvre in a marina, especially if the wind is really strong.
As time passed, we began to wonder about a stern thruster as well. Would it really be useful?
When we anti-fouled Play d’eau in March 2010, we bit the bullet and decided to have a stern thruster fitted. We chose the same make (American Bow Thruster, Side Power) but because it was for the stern it could be slightly less powerful (less windage).
Seeing it came with the upgraded propeller design we upgraded the bow thruster’s propeller at the same time given it would increase power by 15%.
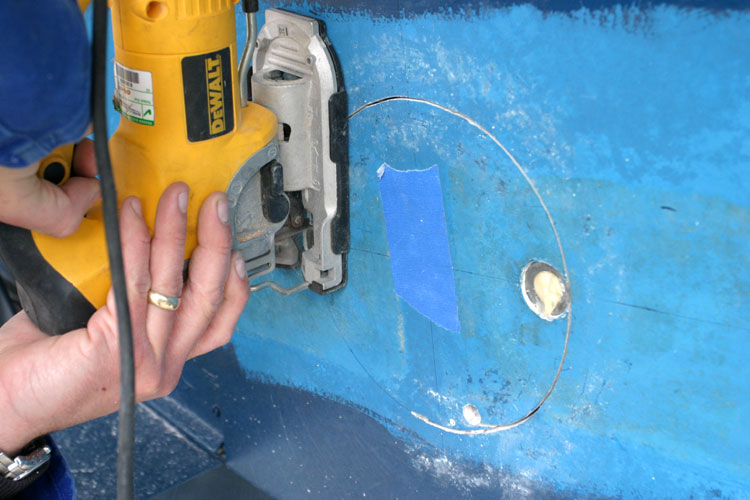
Before the hole could be cut in the transom, the main anodes had to be re-sited.
Watching the hole being cut was unnerving to say the least! Once cut, the thruster was mounted, secured, and the tunnel added. Overhead flaps were added to the tunnel to help prevent cavitation, and dual controls were installed. With the tunnel epoxied and anti-fouled, Play d’eau was ready to be launched.
Were there any water leaks? No. Was it really a good idea to have a stern thruster? Yes, Was it really necessary to have a stern thruster fitted? No. Are we glad we have it? Yes – just in case. Have we used it? Yes….
Piers and Lin
from the Engine Room of Play d’eau
Fleming 55
The hole is cut for the stern thruster click to enlargeThe hole, ready for the thruster click to enlarge
The thruster installed and the tunnel epoxied click to enlargeOverhead flaps added, and anti-fouled click to enlarge
The old (left) and new style propeller (right) click to enlarge
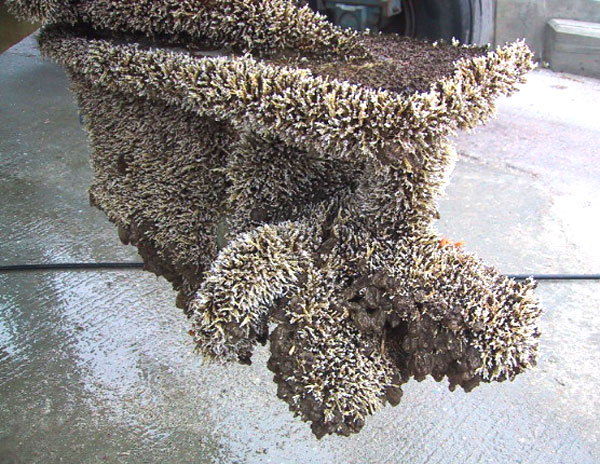
Fouling after one month! click to enlargeWhen we had our Princess V39 we kept her at Berthon Lymington Marina on the Solent.
In September 2002, after just a month of not using her, we went for a short spin to Yarmouth for lunch taking some family members who had never been on board before.
Excitement was high.
Out of the Lymington fairway and past the Jack in the Basket marker, we opened the throttles expecting her to fly.
But something was wrong. The engines wouldn’t rev and we couldn’t increase speed.
Play d’eau’s get up and go had got up and gone – completely.
Back in her berth, I raised the outdrives and found the problem.
Having her lifted revealed all….
Very pretty, but…. click to enlarge
Piers
from the Engine Room of Play d’eau
Fleming 55
These were the voyages of Piers and Lin du Pré aboard their Fleming 55


 and new style propeller (right)")